
Restore a Website from a Zip: The Complete Beginner's Guide
By the Restorix editorial team · September 1, 2026 · 8 min read
Restore your website from the Wayback Machine
Get a free estimate in seconds — you only pay when you confirm. Failed restores refund automatically.
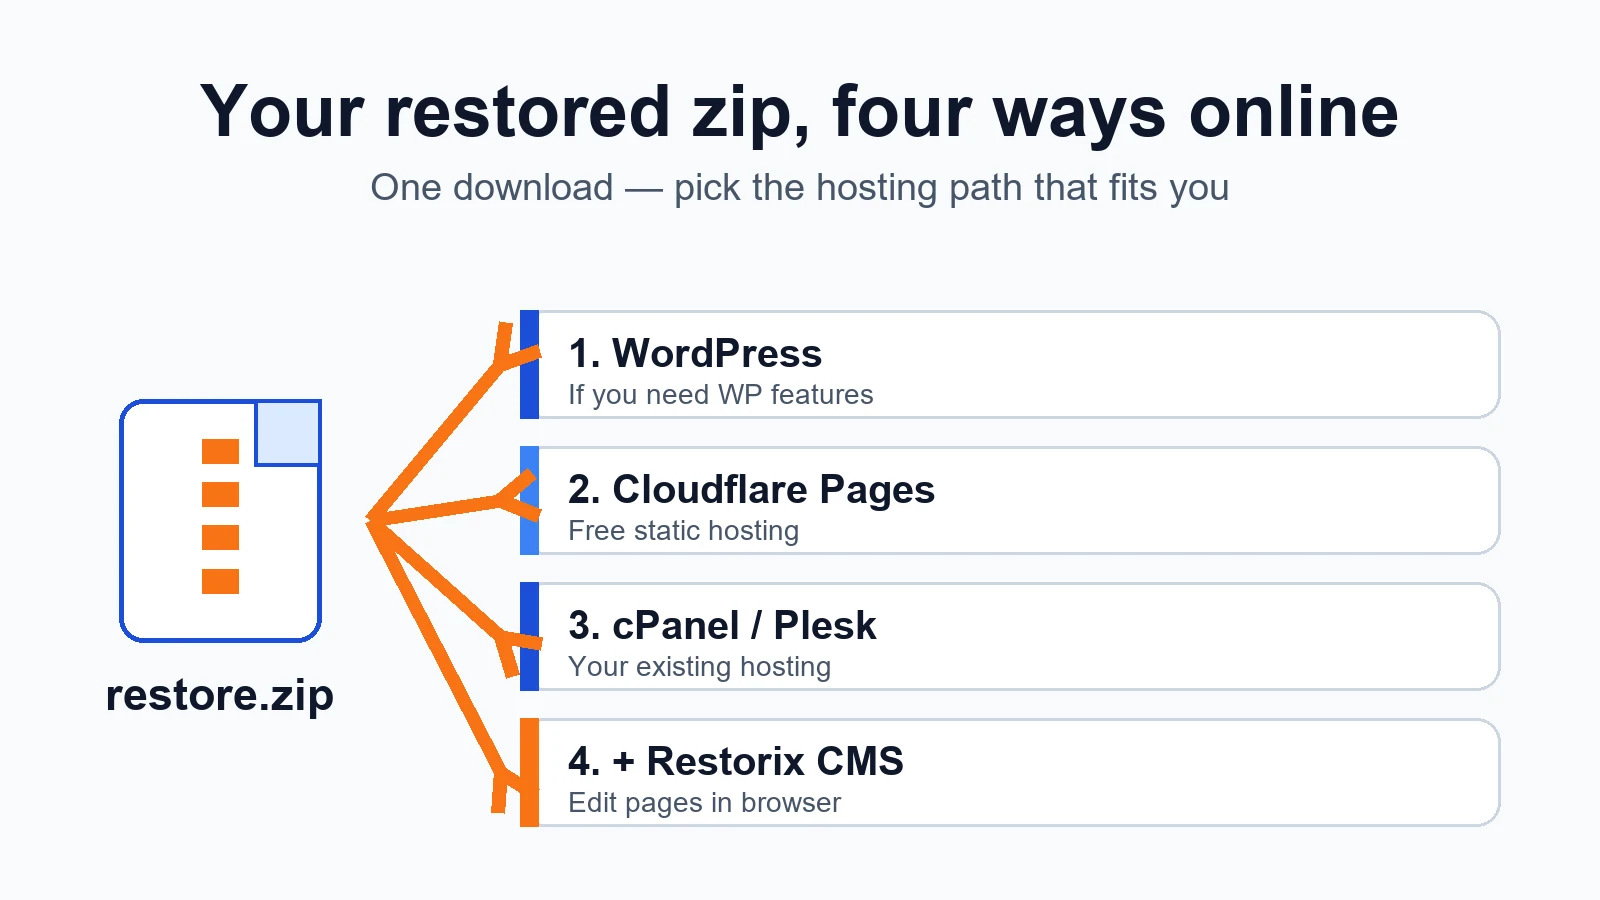
You ran a restore, the job finished, and now there is a zip file sitting in your downloads folder. This guide is about the next ten minutes: turning that zip back into a live website. There are four good ways to do it, and none of them require you to be a developer. I will walk through each one with the exact clicks, tell you which buttons live where, and finish with a comparison table so you can pick the right path for your situation.
What you get when you restore a website from a zip
Open the zip and you are looking at your whole website as plain files. Every page the archive crawler captured is there as an .html file, and every image, stylesheet, and script those pages used is downloaded into folders next to them. Internal links were rewritten to point at the local files, which is why the site works even before you upload it anywhere: find the homepage (usually index.html) and double-click it. Your restored site opens in your browser, straight off your hard drive, no internet needed.
A few files in the zip are extras we added rather than pages from your old site. README-how-to-restore.md is a short version of this guide. webarchive-cms.php is our free single-file CMS. Ignore it for now, section five explains what it does. If you ticked the file-list option when ordering, you will also see __files.txt, __files.json, and __files.sqlite: three formats of the same manifest listing every file in the zip. They are reference material for you, not something the site needs to run.
One thing is deliberately missing: a database. A restore brings back what visitors saw, not the server code behind it. That turns out to be good news for you: static files are the cheapest, fastest, most hack-proof way to host a website, and every path below works without you creating or configuring any database at all.
Restore a website from a zip into WordPress
Restore your website from the Wayback Machine
Get a free estimate in seconds — you only pay when you confirm. Failed restores refund automatically.
Here is the part everyone asks about first. Your zip includes wordpress-import.xml, a file in WordPress' own import format, generated from your restored pages. WordPress cannot swallow a zip of HTML, but it speaks this format natively, so moving the site into WordPress is an upload, not a rebuild. It works on a brand new WordPress install and on a site that is already running.
- Have WordPress ready. On shared hosting, cPanel and Plesk both have one-click installers ("Softaculous", "WordPress Toolkit"). On an existing site, just log in to wp-admin.
- In the WordPress dashboard go to Tools → Import, find WordPress in the list, and click "Install Now" if the importer plugin is missing, then "Run Importer".
- Upload the wordpress-import.xml file from your zip. WordPress creates one page per restored page, with the page title and the full content.
- Upload the images separately. The importer cannot pull pictures out of a zip file, so send the zip's image folders to the Media Library, or to wp-content/uploads over FTP, for the photos to appear.
- Finish the setup: pick your imported homepage under Settings → Reading, build the menu under Appearance → Menus, and add redirects for any old URLs that matter.
Rule of thumb: choose WordPress only if you need WordPress going forward: a blog you will post to weekly, a store, memberships. For everything else, static hosting or the Restorix CMS gets the same site online in a tenth of the time, hosts for free or nearly free, and cannot be taken down by a plugin update.
Restore a website from a zip on Cloudflare Pages (free)
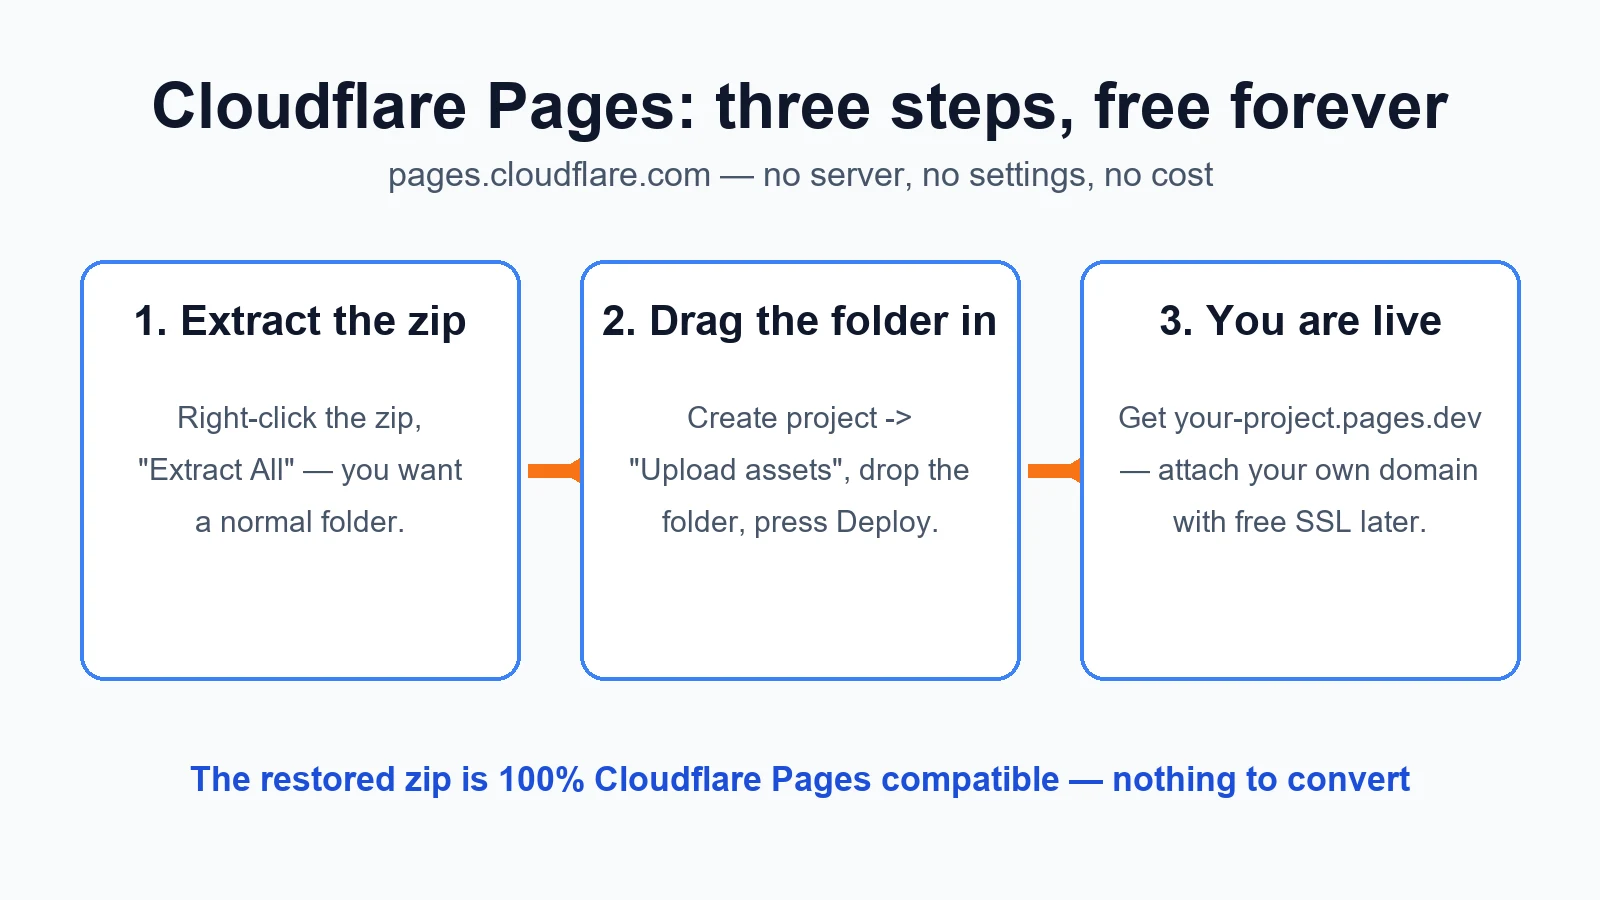
If you have no hosting and no budget, start here. Cloudflare Pages is a free static-site host, and your zip is already 100% compatible with it, so there is nothing to convert, check, or configure. The only real decision is the project name.
- Extract the zip on your computer first. On Windows: right-click the zip, "Extract All". On a Mac: double-click it. You want a normal folder of files.
- Go to dash.cloudflare.com and create a free account. In the left menu open "Workers & Pages", click "Create", switch to the "Pages" tab, and choose the direct upload option ("Upload assets").
- Pick a project name; it becomes your free address, your-project.pages.dev.
- Drag the extracted folder (the folder itself, not the zip) into the upload area and press Deploy. Cloudflare uploads every file and puts the site live in under a minute.
- To use your own domain: open the project, go to "Custom domains", add your domain, and follow the prompt. SSL is automatic and free. If your domain's DNS is already on Cloudflare, one click finishes it.
Updating the site later means repeating step 4: drag the folder again and Cloudflare creates a new deployment, keeping the old one as a rollback. There is no server to maintain, no PHP version to worry about, and the free tier covers normal sites comfortably.
Restore a website from a zip on cPanel or Plesk
If you already pay for shared hosting, your site can live there, and this works on cPanel, Plesk, DirectAdmin, and nearly every other panel because they all share the same idea: a web root folder where your homepage file must sit. The steps below name the cPanel buttons; Plesk differs only in labels.
- Log in to your hosting panel. The address is in your host's welcome email, typically yourdomain.com/cpanel or yourdomain.com:2083 for cPanel, yourdomain.com:8443 for Plesk.
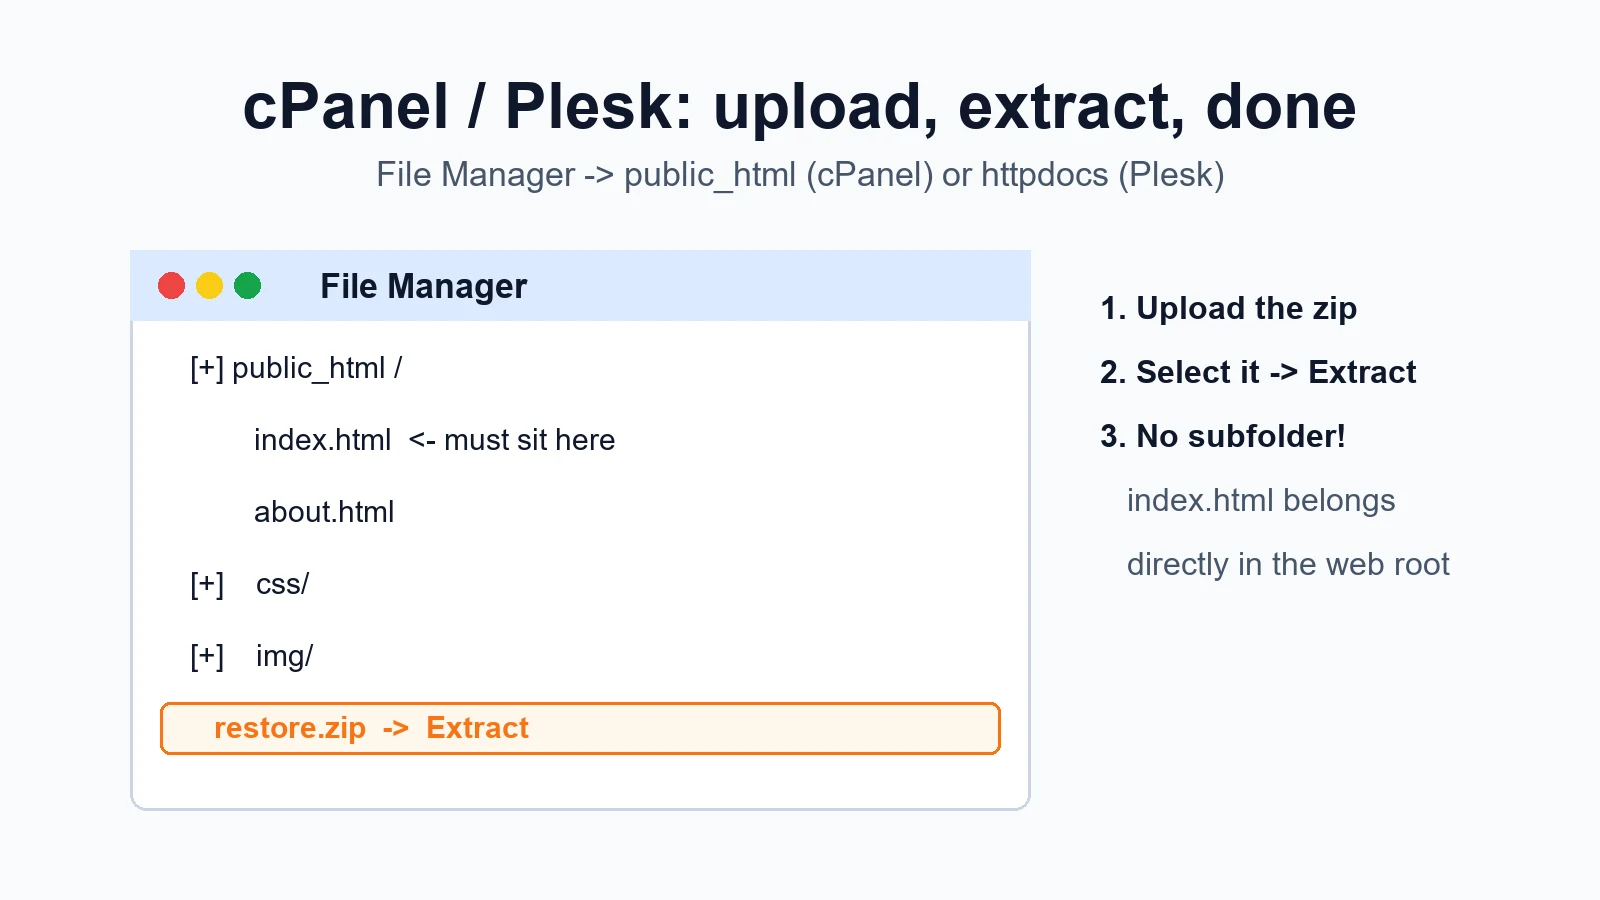
- Open "File Manager" and enter the web root: public_html on cPanel, httpdocs on Plesk.
- Click "Upload" and send the whole zip up. Uploading one zip is far faster than uploading hundreds of small files.
- Back in File Manager, select the uploaded zip and press "Extract". A second later your files appear.
- Check for the classic mistake: if extraction created a subfolder and your files landed inside it, open that folder, select everything, and use "Move" to bring it all up into public_html directly. index.html must sit in the web root itself, one level up from where it probably is now.
- If the domain is not pointing at this hosting yet, change its nameservers to the ones in your host's welcome email. Then visit the domain: your restored site is live.
Prefer FTP? That works too, just slower: extract the zip on your computer, connect with FileZilla, and drag the files into public_html. Whichever way you upload, keep the folder structure intact, since pages find their images and styles by relative paths, so flattening everything into one directory breaks the design.
Edit it too: restore a website from a zip with the Restorix CMS
A plain static upload has one annoyance: changing a phone number means editing HTML by hand and re-uploading. The Restorix CMS fixes that, and it is already inside your zip as the file webarchive-cms.php. It is free, open-source (GPL v3), and runs on any hosting with PHP, which means every cPanel and Plesk host on the market. Details and feature list live on the Restorix CMS page.
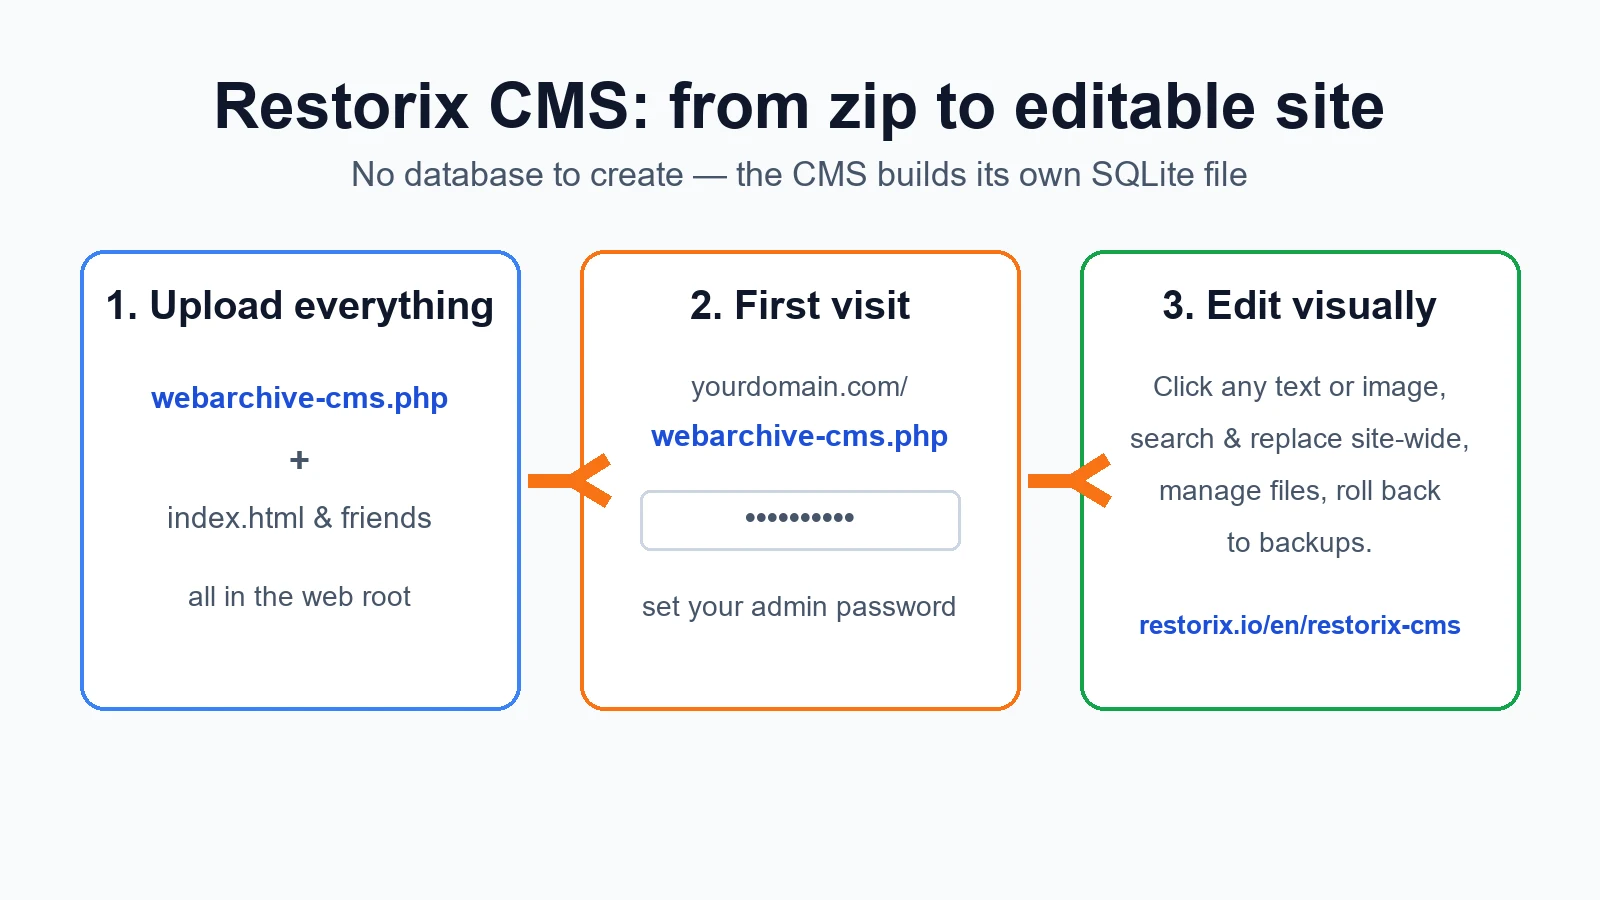
- Upload and extract the zip exactly as in the cPanel steps above, making sure webarchive-cms.php ends up next to index.html in the web root.
- Visit yourdomain.com/webarchive-cms.php in your browser.
- The first launch asks you to create your admin password. Choose a strong one and store it somewhere safe, as this is the only setup step that exists.
- The CMS imports your pages by itself and keeps its data in a built-in SQLite file. You never create a database, never touch phpMyAdmin, never edit a config file.
- From the admin panel you can click into any page and edit text and images visually, run search & replace across the whole site (useful for old phone numbers and emails), manage files, and roll back to backups.
The CMS runs on PHP 5.6 through PHP 8.x, and safe mode is on by default so you cannot break the site while learning the panel.
Other ways to put the zip online
- Netlify or Vercel: same idea as Cloudflare Pages: Netlify Drop (app.netlify.com/drop) takes the extracted folder by drag & drop on a free plan.
- GitHub Pages: push the files to a repository and enable Pages. Free and reliable, but you need basic git.
- Your own VPS: copy the files to /var/www/yoursite and point nginx at the folder. Cheapest raw hosting there is, if you are comfortable in a terminal.
- Nowhere: the zip also works as a permanent offline archive. Keep it, and the site is never truly lost again.
Which path should you pick?
| Path | Cost | Difficulty | Editable after | Best for |
|---|---|---|---|---|
| WordPress | Hosting plus your time | Medium | Yes, full WordPress | Sites that need a blog, store, or memberships |
| Cloudflare Pages | Free | Easy | Re-upload to change | Brochure sites, portfolios, landing pages |
| cPanel / Plesk static | Hosting you already pay | Easy | Re-upload to change | Sites that must stay on existing hosting |
| cPanel / Plesk + Restorix CMS | Hosting you already pay | Easy | Yes, in the browser | Sites you will actually edit |
Still unsure? Do the Cloudflare Pages upload now (it costs nothing and takes five minutes) and move to your own hosting later if you outgrow it. A restored site that is online somewhere beats a perfect plan sitting in your downloads folder.
Restore your website from the Wayback Machine
Get a free estimate in seconds — you only pay when you confirm. Failed restores refund automatically.
FAQ
Do I need to create a database for any of this?
No. Static hosting (Cloudflare Pages, cPanel upload) uses no database at all. The Restorix CMS creates and manages its own SQLite file automatically on first launch, so you never open phpMyAdmin or write credentials into a config. WordPress is the only path that needs a database, and its installer creates one for you during the one-click setup.
I uploaded everything but see a list of files instead of my homepage. What went wrong?
Your files are one level too deep. Extraction usually creates a subfolder, so index.html ended up inside public_html/something/ instead of public_html/ itself. Open the subfolder in File Manager, select everything, and move it up one level. The homepage file must sit directly in the web root.
Can I keep using my old domain name?
Yes. On Cloudflare Pages, add it under Custom domains and SSL is handled for you. On shared hosting, set the domain's nameservers to your host's (they are in the welcome email). Either way the restored site answers on the old address, which is what brings old backlinks and bookmarks back to life.
My old site had a contact form. Will it work after the restore?
Not by itself, because a static restore has no server code to receive form submissions. The easy fix is a form service such as Formspree: point the form's action at their URL and submissions arrive by email. The Restorix CMS path and shared hosts with PHP can also use a simple PHP mailer script.
I don't want the CMS. Should I delete webarchive-cms.php?
Yes, delete it if you are going pure static. One less file is one less thing to think about. Leaving it unused is also safe because it does nothing until someone sets an admin password on it, but deleting is tidier. On Cloudflare Pages it is simply never executed, since Pages serves static files only.
Related guides

old web page recovery
Old Web Page Recovery: Fastest Ways to Find a Lost Page
Old web page recovery ranked by speed: Wayback Machine, archive.today, search engine caches, and forgotten sources to bring back a single lost page.

best free cms
Best Free CMS in 2026: Picks by Use Case, Not Hype
The best free CMS depends on the job: blog, restored archive site, small business, or landing page. Real picks, honest trade-offs, and a decision table.

internet wayback machine
Internet Wayback Machine vs Internet Archive: What's the Difference
People type 'internet wayback machine' and mean two different things. Here's how the Internet Archive and the Wayback Machine differ, and what each gives a webmaster.
download archive org
How to Download from Archive.org: Items, Snapshots & More
Every practical way to download Archive.org content, item files, bulk CLI pulls, and Wayback web snapshots, and how to pick the right one for your job.